Alien Clickaloo Play Set


Alien Clickaloo Play Set
Published 2018-07-30T09:36:47+00:00
Game over, man! Game over!
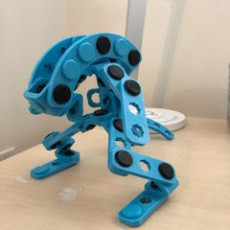
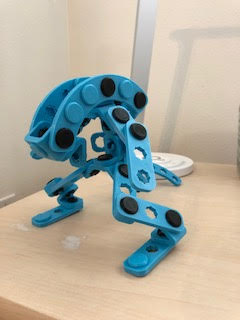
It's never too early to teach your kids about aliens! Let them build their own xenomorph using standard Clickaloo parts, and acquaint themselves cheerfully with the horror that lies waiting for them in deep space!
Now, this is an entry in the MyMiniFactory #Clickaloo design contest, so you can refer to the Clickaloo site for more details about the construction set itself. That said, all the parts you need are attached to this project, along with quantities required for each one.
Check out the images for full build instructions!
And remember, they mostly come out at night... mostly.
How the build instructions were made:
In case it helps anyone else (and because I've had a few messages about it!), here's my process for compiling pictorial build instructions!
1. Load the Clickaloo components you need into TinkerCad. Tinker already renders things in a nice illustrative style that's perfect for this!
2. Assemble your model in Tinkercad.
3. Switch to orthographic mode, rather than perspective mode! This bit is important for that classic Lego instruction style.
4. Take some nice pictures of your model with a screen capture tool. I think Tinker might have a screenshot feature, so go with whatever works for you.
5. Duplicate your model, so you still have a completed version, then use the hide tool to remove it from view.
6. Start pulling apart the model, step-by step, and take screen captures as you go. Basically, build up the instructions in reverse.
7. Open your image editing program of choice, build your steps based on screen captures, add lines and text, and you're done!
Hope that's useful!


Since I didn't design the components themselves, I can only speculate as to how Clickaloo parts are to be printed - it's probably worth seeing if there are any official tips published somewhere!
One thing I will point out, though, is that the pins shouldn't really be printed in the obvious orientation, flat-face-down, especially in PLA, as they'll be prone to snapping. I ended up reprinting all the pins on their sides, which necessitates support, but at least yields a much stronger object! Of course, you might get better results in something like PETG or ABS - PLA is fairly brittle by comparison.
| Date published | 30/07/2018 |
| Tecnología | FDM |
| Complejidad | Fácil |
| Sin apoyo | YES |
Fun project. It was a little hard to click in some pegs but I put that down to printing issues. Next time I might try to print the pegs in a flexible.